As IT professionals, many of us think of managing
applications as installing the application on the computer. But there
are other details that may need to be configured to allow applications
to run better, faster, and more efficiently.
1. Configuring Applications
As operating systems evolve,
one issue that you can run into is that your applications may not work
properly on the newer operating system. Microsoft has developed a few
different ways to help you combat this issue.
1.1. Windows 7 XP Mode
One technology that has
started to sweep the computer industry is called virtualization.
Virtualization is the ability to run one operating system on top of
another. For example, Microsoft Hyper-V is a virtualization feature on
Windows Server 2008 R2 that allows you to run multiple versions of
operating systems simultaneously on one computer.
Microsoft has a virtualization environment that can operate on its client software called Windows Virtual PC.
Windows Virtual PC allows you to create and manage virtual machines
without the need for a server operating system. The advantage here is
that you can run operating systems in a client environment like Windows
XP, Windows Vista, or Windows 7. You must have Windows 7 Professional,
Enterprise, or Ultimate to download and run Windows XP Mode. All other
versions must use Windows Virtual PC. All other Windows 7 versions can
just download Windows Virtual PC.
Windows Virtual PC gives you the
ability to set up virtualization on a client operating system. This is
very beneficial for anyone in the industry who has to do testing or
configuration. Windows Virtual PC is not really meant to run a network
like Hyper-V, but it does give an administrator the ability to test
software and patches before installing them live on a network or running
applications in an operating system other than the installed one. Also,
it is very beneficial to research problems in a controlled environment
and not on a live server where you can end up doing more harm than good.
Finally, Windows
Virtual PC gives you a training advantage. Think about having the
ability to train users on a real product like Windows Server 2008 or
Windows 7 without needing to purchase additional equipment. Windows
Virtual PC allows you to train users on products and software while
using only one machine.
|
As an instructor and consultant, I
can't say enough about how valuable Microsoft Virtual PC can be as a
tool. I have used it on many occasions to either test a piece of
software before installation or find an answer to a problem in a
controlled environment.
Currently, at the time this book
is being written, I use Microsoft Windows Vista on my laptop. On that
same laptop I have a version of Windows Virtual PC with both Windows
Server 2008 and Windows 7 Ultimate operating system virtual machines.
While I am on a client site or
while I am in the classroom, having a way to test and research problems
using multiple operating systems on one client computer system is
invaluable.
|
To run Windows Virtual PC,
you need a minimum of a 400 MHz Pentium-compatible processor (1,0 GHz or
faster recommended) and at least 35 MB of free disk space. You can load
Windows Virtual PC on Windows 7, Windows Vista with SP1 (Enterprise,
Business, Ultimate), and Windows XP with SP3.
Professional and Ultimate can
use the Windows XP Mode. All other versions complete the following steps
to download and configure Windows Virtual PC on a Windows 7 machine.
After the download completes, install the application to your system. Once the product is installed, open the Windows Virtual PC application by choosing Start => All Programs => Windows Virtual PC. When you start Windows Virtual PC, the New Virtual Machine Wizard will automatically appear. Click Next. At the Options screen, click the Create A Virtual Machine radio button. At the virtual machine Name and Location screen, type VirtualWin7 and then click Next. At the Operating System screen, choose Other in the pull-down box (if you are going to install Windows 7 32-bit). Click Next. At the Memory screen, choose the Adjust The RAM radio button and set it to 1024 (512 minimum if needed). Click Next. At the Virtual Hard Disk screen, click the New Virtual Hard Disk radio button and click Next. At
the Virtual Hard Disk Name And Location screen, accept the default
location and click Next. You can change the name or location if needed. At the Completing The New Virtual Machine screen, verify the settings and click Finish. The
Windows Virtual PC console will now show the VirtualWin7 virtual
machine. Click the virtual machine and choose Settings under the Actions
menu. The
Settings for VirtualWin7 will appear. Here is where you can change or
verify your settings for this virtual machine. Click on CD/DVD drive and
verify that you are using the local DVD drive. Click OK. Put the Windows 7 32-bit DVD in the physical drive. At the Windows Virtual PC console screen, click VirtualWin7 and click Start. Install
Windows 7 onto the virtual machine. If for any reason the DVD does not
get recognized, click the CD menu item and choose the Use Physical CD
option. Click Enter and finish the install. After Windows 7 is installed, close the VirtualWin7 virtual machine and save the changes.
|
If you are using Windows 7
Enterprise, Ultimate, or Professional, Microsoft has an XP virtual
machine insert that allows you to run Windows XP applications on Windows
7. This is known as Windows 7 XP Mode.
If you have applications that ran properly on Windows XP but aren't
running well on Windows 7, running the applications in XP Mode solves
this issue.
1.2. Understanding Shims
When new operating systems
get released, older applications may not run and you may not be able to
get a newer version. For example, a vendor that sold you an application
has gone out of business, but the application is still needed in your
organization.
If you install the application on Windows 7, there may be issues. This is where shims apply. The shim (known as Shim Infrastructure) is a coding fix that allows the application to function properly.
The Shim Infrastructure (http://technet.nicrosoft.com/en-us/1ibrary/dd837644(WS.lO).aspx)
consists of application programming interface (API) hooking. What this
means is that the Shim Infrastructure uses linking to redirect API calls
from the Windows operating system to the alternative code called the
shim.
To have shims
created, you must first contact Microsoft. Microsoft must create the
shim; Microsoft does not offer any custom tools to allow for private
creation. Microsoft does include shims with Windows 7 and new shims will
be available through Windows Update as they are created.
1.3. Windows 7 Compatibility Mode
Another way to try to run an
older application in Windows 7 is by setting the compatibility mode.
Let's say that an application worked fine in Windows XP but it is not
working correctly in Windows 7. You can set that application to run in
compatibility mode for a previous operating system (see Figure 1).
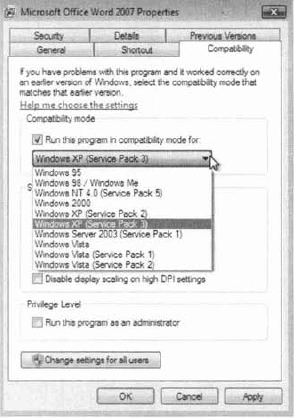
There are some other features that you can enable when setting the compatibility options:
Run In 256 Color
Run In 640 × 480 Screen Resolution
Disable Visual Themes
Disable Desktop Composition
Disable Display Scaling On High DPI Settings
Run This Program As An Administrator
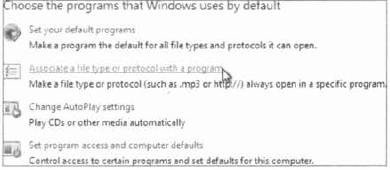
1.4. File Extension Association
One task that may need to
be performed is associating a file to a particular application. For
example, you may want all files with the filename extension .asx to be
played through Windows Media Player. You have the ability to set these
file extension associations in Default Programs in Control Panel. Within
Default Programs, there is an Associate A File Type Or Protocol With A
Program link, as shown in Figure 2.
Another application that is
used in Windows 7 that we need to discuss is Internet Explorer 8. In the
next section we will look at configuring and managing Internet Explorer
8.